


Acoustic treatment is an essential part of building a home recording studio. Poor acoustics can lead to unwanted reflections, standing waves, and other issues that can negatively impact the sound quality of your recordings. Here are some tips for acoustically treating a room for recording sound. We hope you enjoy these tips on how to soundproof room acoustically.
- Identify problem areas: The first step in acoustic treatment is to identify the problem areas in your room. You can use an acoustic analyzer or simply walk around the room and listen for any issues with the sound quality. Common problem areas include corners, near windows, and near hard surfaces such as concrete or hardwood floors.
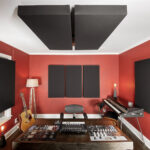
- Use acoustic panels: Acoustic panels are an effective way to absorb sound and reduce unwanted reflections in a room. They come in different shapes, sizes, and materials, and can be mounted on walls or hung from the ceiling. The most common type of acoustic panels are made from foam, but other materials such as rock wool or fiberglass can also be used.
- Add bass traps: Bass traps are designed to absorb low-frequency sound waves that can cause standing waves in a room. They are typically mounted in the corners of a room, and are especially important for rooms with a lot of hard surfaces.
- Use foam tiles: Foam tiles are an economical way to add acoustic treatment to a room. They can be used to cover large areas of a wall or ceiling, and are easy to install. They are effective at absorbing sound, but may not be as effective as other types of acoustic treatment.
- Place rugs and furniture strategically: Placing rugs and furniture strategically in a room can also help to absorb sound and reduce unwanted reflections. Rugs and furniture can be especially useful in rooms with hard floors, as they help to absorb low-frequency sound waves that can cause standing waves.
- Experiment with placement: Experimenting with the placement of acoustic panels, bass traps, and foam tiles is an important part of getting the best sound quality from your room. Try different arrangements and listen for any changes in the sound quality. You may find that some arrangements work better than others, so it’s important to be open to making changes as needed.
- Check for sound leakage: Finally, it’s important to check for sound leakage in your room. This means ensuring that sound from your recording studio doesn’t leak into other parts of your home, and vice versa. You can use acoustic seals, soundproof curtains, or other materials to prevent sound leakage and ensure that your recordings are as quiet and interference-free as possible.
By following these tips, you’ll be on your way to acoustically treating a room for recording sound. A well-treated room will provide a more balanced and accurate sound, making your recordings sound more professional and allowing you to focus on the creative aspects of recording.